Как решить проблему с медленным интернетом?
2. Для VIP-пользователей откройте iTop VPN> Все серверы> ** Самые быстрые серверы> Подключиться и повторите попытку.
Если приведенное выше решение не помогает, откройте iTop VPN> щелкните значок Параметры в правом верхнем углу> щелкните Отзыв, отправьте отзыв, чтобы мы могли вам помочь.
Как решить проблему «невозможно подключиться к iTop VPN», «нестабильное VPN-соединение», «нет Интернета после подключения к VPN»?
Если приведенное выше решение не помогает, откройте iTop VPN> щелкните значок Параметры в правом верхнем углу> щелкните Отзыв, отправьте отзыв, чтобы мы могли вам помочь.
Почему некоторые программы несовместимы с iTop VPN?
Причина в том, что некоторые антивирусные программы или брандмауэры блокируют подключение iTop VPN, что может вызвать сбой подключения по VPN. Что еще хуже, если ваш компьютер успешно подключается к VPN, подключение к Интернету может отсутствовать без видимых причин. В этой ситуации вам может потребоваться удалить сторонние программы, чтобы использовать iTop VPN в обычном режиме.
Я еще не получил купленный продукт / пароль / лицензию / код активации, что мне делать?
2. Если вы уже вошли в свой iTop VPN с адресом электронной почты, на который вы разместили заказ, ваш iTop VPN автоматически превратится в VIP-аккаунт, когда ваш заказ будет успешно обработан.
3. Если вы не зарегистрировали учетную запись с адресом электронной почты, на который вы разместили заказ, проверьте папку «Спам» или «Нежелательная почта» на предмет электронного письма, отправленного с адреса noreply@itopvpn.com, которое включает адрес электронной почты вашего VIP-аккаунта и временный пароль. Затем следуйте инструкциям на странице https://ru.itopvpn.com/how-to-activate, чтобы войти в учетную запись VIP.
• Откройте https://ru.itopvpn.com/reset-password, введите адрес электронной почты, используемый при размещении заказа, нажмите кнопку «Отправить», чтобы сбросить пароль.
• Или откройте iTop VPN, нажмите кнопку «Параметры» в правом верхнем углу> Войти> Нажмите «Забыли пароль?» для получения ссылки для сброса пароля.
Если приведенные выше решения не помогают, откройте iTop VPN> щелкните значок Параметры в правом верхнем углу> щелкните Отзыв, отправьте отзыв, чтобы мы могли вам помочь.
Что мне делать, если при входе я получаю неверный адрес электронной почты / пароль?
• Откройте https://ru.itopvpn.com/how-to-activate, введите свой адрес электронной почты, нажмите кнопку «Отправить», чтобы сбросить пароль.
• Или откройте iTop VPN, нажмите кнопку «Параметры» в правом верхнем углу> Войти> Нажмите «Забыли пароль?» для получения ссылки для сброса пароля.
Почему я все еще использую бесплатную / ограниченную версию после покупки iTop VPN?
Щелкните здесь, чтобы просмотреть подробные инструкции по активации iTop VPN VIP.
Если приведенное выше решение не помогает, откройте iTop VPN> щелкните значок Параметры в правом верхнем углу> щелкните Отзыв, отправьте отзыв, чтобы мы могли вам помочь.
Что такое iTop VPN?
Каковы основные особенности iTop VPN?
• Умная Локация может автоматически выбрать для вас наиболее стабильный сервер. Также можно найти конкретную страну для подключения.
• Сетевые протоколы предоставляют несколько протоколов для удовлетворения различных потребностей в Интернете.
• Неограниченная пропускная способность (Unlimited Bandwidth) также является невидимой функцией, позволяющей вам наслаждаться любимым контентом, не беспокоясь о достижении пределов пропускной способности.
Каковы системные требования iTop VPN для Windows?
• Windows 11/10/8.1/8/7
• 300 МБ свободного пространства на диске
• Разрешение экрана 1024 * 768 и выше
• Для некоторых устройств с Windows 7 может потребоваться установка Центра обновления Windows (kb4474419), чтобы убедиться, что iTop VPN правильно работает на вашем ПК.
Учетная запись iTop VPN поддерживает несколько устройств?
Как остановить автоматический запуск iTop VPN при запуске Windows?
Что такое сетевые протоколы и как выбрать из предустановленных?
Какой сервер мне подходит?
Как удалить iTop VPN?
Откройте «Пуск»> «Параметры»> «Приложения» > «Программы и компоненты» или «Приложения и возможности» на левой панели> Найдите iTop VPN и нажмите «Удалить»> Следуйте инструкциям на экране.
Windows 8.1 и 8:
Откройте «Пуск»> «Панель управления»> «Программы и компоненты»> Найдите iTop VPN и нажмите «Удалить»> «Да», когда появится запрос на удаление программы> Следуйте инструкциям на экране, чтобы удалить программу с вашего компьютера.
Windows 7:
Нажмите «Пуск» на панели задач и выберите «Панель управления»> Под «Программами», нажмите «Удалить программу»> Выберите iTop VPN> «Нажмите «Удалить» в верхней части списка программ> Следуйте инструкциям на экране, чтобы удалить программу с вашего компьютера.
Как проверить, действительно ли мой реальный IP-адрес скрыт с помощью iTop VPN?
Однако, из-за кеша браузера после подключения к серверу iTop VPN может появиться старый IP-адрес, который до этого отображался в Google. В этом случае необходимо очистить кеш браузера и перезапустить его для повторного поиска. Или выполнить поиск в другом браузере.
Что такое iTop Приватный VPN?
iTop Приватный VPN - это простой в использовании, но многофункциональный веб-браузер на основе Chromium со встроенной поддержкой VPN и некоторыми инструментами безопасности. Благодаря этим функциям и инструментам iTop Приватный VPN может обеспечить вам быстрый, конфиденциальный и удобный доступ в интернет.
Как iTop Приватный VPN защищает мою безопасность и конфиденциальность?
Анти-фишинг:
Предотвращает доступ к вредоносным веб-сайтам и защищает вас от утечек конфиденциальности, онлайн-угроз и майнинга криптовалюты.
Каковы системные требования iTop Приватный VPN?
• Windows 11/10 / 8.1 / 8/7 (64-разрядная)
• 500 МБ свободного дискового пространства.
• Разрешение экрана 1024 * 768 и выше
Совместим ли iTop Приватный VPN с другими браузерами?
Да, iTop Приватный VPN совместим с другими браузерами. Вы также можете импортировать закладки из других браузеров или HTML-файла закладок.
Как импортировать закладки в iTop Приватный VPN?
Откройте iTop Приватный Браузер > Нажмите «Импортировать закладки ...» под адресной строкой> Выберите браузер или HTML-файл или закладки > Нажмите «Импорт», чтобы начать импорт.
Поддерживаемые браузеры: Chrome, Microsoft Edge, Mozilla Firefox и Opera
В чем разница между iTop Приватный VPN Free и iTop Приватный VPN VIP?
iTop Приватный VPN VIP включает в себя все функции iTop Приватный VPN Free. Кроме того, у iTop Приватный VPN VIP больше VPN-серверов, более высокая скорость интернета и лучшая техническая поддержка.
Будет ли iTop Приватный VPN сохранять мою информацию?
Нет. У нас есть строгая политика отсутствия журналирования, что означает, что мы не регистрируем ваши действия, пока вы пользуетесь сервисом.
Я еще не получил купленный продукт / пароль / лицензию / код активации, что мне делать?
1. Вам не нужен код активации или лицензионный код для активации VIP-учетной записи iTop Приватный VPN.
2. Если вы уже вошли в свой iTop Приватный VPN с адресом электронной почты, на который вы разместили заказ, ваш iTop Приватный VPN автоматически превратится в учетную запись VIP уровня, когда ваш заказ будет успешно обработан.
3. Если вы не зарегистрировали учетную запись с адресом электронной почты, на который вы разместили заказ, проверьте папку «Спам» или «Нежелательная почта» на наличие электронного письма, отправленного с адреса noreply@itopvpn.com, которое включает адрес электронной почты вашей VIP-учетной записи и временный пароль. Затем следуйте инструкциям на странице https://www.itopru.com/how-to-activate, чтобы войти в учетную запись.
4. Если вам не удалось найти свой пароль, вы можете сбросить его следующими способами:
Откройте https://www.itopru.com/reset-password, введите адрес электронной почты, который использовался при размещении заказа, нажмите кнопку «Отправить», чтобы сбросить пароль.
Как удалить iTop Приватный VPN?
Windows 11 и 10:
Откройте «Пуск» > «Настройки» > «Приложения» в меню «Настройки» > «Программы и компоненты» или «Приложения и функции» на левой панели > «Найдите iTop VPN Браузер» и нажмите «Удалить» > «Следуйте инструкциям на экране».
Windows 8.1 и 8:
Откройте «Пуск» > «Панель управления» > «Выберите программы и компоненты» > «Найдите iTop VPN Браузер» и нажмите «Удалить» > нажмите «Да», когда появится запрос на удаление программы > Следуйте инструкциям на экране, чтобы удалить программу с вашего компьютера.
Windows 7:
Нажмите «Пуск» на панели задач и выберите «Панель управления» > «Программы», нажмите «Удалить программу» > «Выбрать iTop VPN Браузер» > «Удалить» в верхней части списка программ > «Следуйте инструкциям на экране», чтобы удалить программу с вашего компьютера.
Is there a limitation on recording length?
No, there is no limitation on recording length. However, the recording could be limited by the capacity of free drive space where you save the recorded files to. Also, be aware that recording longer time will create very large files that may reduce system performance while working on them like editing and exporting.
Is there watermark in the recorded video?
You can record with/without watermark as per your needs as follows:
Please click Watermark in the main screen > select Default to record with watermark or select No watermark or select Customize to edit your own watermark.
How to record my PC screen with iTop Screen Recorder?
Please follow the steps as follows to start your record:
1. Open iTop Screen Recorder.
2. Select to record screen/video or audio
3. If you select to record screen/video, please click the drop-down arrow near full screen to select the region or window or full Screen to record.
4. Click the record button REC to start recording.
5. Click the red Done button in Floating Toolbar or press F9 (for video by default) or F8 (for audio by default) to complete recording.
How to record audio from my microphone and speaker into video simultaneously?
Please click the ON/OFF buttons for both microphone and speaker in the main screen to enable the features before your recording.
How to record mouse actions and add mouse click effects in my record?
iTop Screen Recorder supports recording with mouse actions, please click the OFF button for mouse in the main screen to enable mouse actions.
To add mouse click effects to your recording, please click Options > click Settings > click Record in the left panel > tick Add highlight effects (ticked by default) and/or Add click animation per your needs.
How to share my recorded videos to third party platforms such as YouTube, Facebook, Instagram, and Twitch?
You can share the videos to third party platforms as follows: Right click the recorded video in Videos under My creations in the main screen > click Upload > click the platform you want to share to.
Where will the recorded video be saved to?
To find the default saved to directory, please go to Options > Settings > Record. You can also click the folder icon to change the directory.
How to trim my recorded video with iTop Screen Recorder?
Please right click the recorded video in Videos under My creations in the main screen and click Edit. Then you can trim the video as you like.
Can I record two monitors simultaneously?
Yes, you can record two monitors as follows:
Open iTop Screen Recorder > Select Region > drag your mouse to select the two monitors at the same time to record two monitors.
How do I register/refresh my iTop Screen Recorder PRO edition?
Please click here to view the detailed instructions to register/refresh iTop Screen Recorder PRO edition.
How to change language?
Open iTop Screen Recorder > Click Options icon on the top right > click Settings > choose the language you want under General settings.
How to update iTop Screen Recorder?
Pro users can always enjoy the latest version automatically with Automatically update to the latest version ticked in Settings.
Free users can manually update iTop Screen Recorder as follows:
Click Options icon on the top right and select Check for updates to update your program.
How to record webcam into video simultaneously?
Please click the ON/OFF buttons for webcam in the main screen to add webcam overlay into your video.
You can also go to Options > Settings... > Webcam to set the overlay position and size.
How to uninstall iTop Screen Recorder?
Windows 10:
Open Start > Click Settings > Click Apps on the Settings menu > Select Programs & features or Apps & features from the left panel > Find iTop Screen Recorder and click Uninstall > Follow the on-screen prompts
Windows 8.1 & 8:
Open Start > Click Control Panel > Select Programs & features > Find iTop Screen Recorder and click Uninstall > Click the Yes button when prompted to uninstall the program > Follow the on-screen instructions to remove the product from your computer
Windows 7 and Windows Vista:
Click Start on your taskbar and select Control Panel > Under Programs (Windows 7) or Programs and Features (Windows Vista), click on Uninstall a program > Select the product you wish to uninstall > Click Uninstall at the top of the program list > Follow the on-screen instructions to remove the program from your computer.
Windows XP:
Click Start on your taskbar and select Settings > Click on Control Panel > In the Control Panel window, click on Add or Remove Programs > Select the product you wish to uninstall > Click Change/Uninstall > Follow the on-screen instructions to remove the program from your computer.
How to fix the “No webcam detected” issue?
When your webcam isn’t recognized by iTop Screen recorder, you can try the following steps to solve the issue:
Solution for built-in webcam:If you are using a built-in webcam, make sure that the webcam is turned on.
Solution for an external connected webcam:
1) Disconnect and reconnect your webcam, or reconnect it with a different USB port (USB 2.0 or USB 3.0 port) on your PC.
2) Disconnect other unused USB devices if any.
3) Check your antivirus software and make sure it does not block access or permission to use your webcam.
4) Uninstall your webcam driver and scan for hardware changes.
Open Device Manager, right click on your webcam, and then select Properties > Select the Driver tab and select Uninstall > Delete the driver software for this device and select OK > On the Action menu, select Scan for hardware changes. Wait for it to scan and reinstall updated drivers, and restart your PC to see if it works.
5) If your webcam works properly with other apps like MSN, Skype, etc., but only cannot work with iTop Screen recorder, please contact us for assistance.
How to fix the “No Sound" issue from speaker and/or microphone in recorded videos?
Please click here to get detailed solutions.
How to fix the error “The current directory is not accessible”?
Please click here to get detailed solutions.
How to fix the error “Failed to load the recording library.”?
What image formats do you support?
Currently, JPEG, PNG, and BMP are supported.
How to change language?
Open iTop Screenshot> Click Menu icon on the top right > click Settings > choose the language you want under General settings.
How to take a screenshot?
You have 2 methods to take screenshots:
1) Please click Capture button in the main screen of the program to start to capture.
2) You can take screenshot through hotkeys according to your personal settings.
By default:
Start to Capture: Alt+A
Capture full screen: Alt+S
Capture the active window: Alt+W
Capture scrolling window: Alt+d
How to copy a screenshot to the Windows clipboard?
Please click the icon “copy to clipboard” in the floating toolbar when capturing or press Ctrl+C.
How to annotate or highlight my screenshot?
You can annotate or highlight your screenshot by clicking the corresponding icon for Rectangle, Oval, Line Arrow, Paintbrush, and Text in the floating toolbar during capture.
Where will the screenshots be saved to?
To find the default saved to directory, please go to Menu > Settings. You can also click the folder icon to change the directory in Settings or click the drop-down arrow near Save in the floating toolbar to change.
How to share my screenshots to third party platforms such as Facebook, Twitter, Pinterest, and Imgur?
Click the “Share to” icon in the floating toolbar and then select the platforms you want to share.
How to uninstall iTop Screenshot?
Windows 10:
Open Start > Click Settings > Click Apps on the Settings menu > Select Programs & features or Apps & features from the left panel > Find iTop Screenshot and click Uninstall > Follow the on-screen prompts.
Windows 8.1 & 8:
Open Start > Click Control Panel > Select Programs & features > Find iTop Screenshot and click Uninstall > Click the Yes button when prompted to uninstall the program > Follow the on-screen instructions to remove the product from your computer.
Windows 7 and Windows Vista:
Click Start on your taskbar and select Control Panel > Under Programs (Windows 7) or Programs and Features (Windows Vista), click on Uninstall a program > Select the product you wish to uninstall > Click Uninstall at the top of the program list > Follow the on-screen instructions to remove the program from your computer.
Windows XP:
Click Start on your taskbar and select Settings > Click on Control Panel > In the Control Panel window, click on Add or Remove Programs > Select the product you wish to uninstall > Click Change/Uninstall > Follow the on-screen instructions to remove the program from your computer.
What is iTop Data Recovery?
iTop Data Recovery is a light yet powerful data recovery software to help you recover the accidentally lost documents, data files, videos, photos and more from HDD, SSD, USB, Memory Card, etc.
How do I register my iTop Data Recovery PRO edition?
Please click here to view the detailed instructions to register iTop Data Recovery PRO edition.
How to uninstall iTop Data Recovery?
Windows 10:
Open Start > Click Settings > Click Apps on the Settings menu > Select Programs & features or Apps & features from the left panel > Find iTop Data Recovery and click Uninstall > Follow the on-screen prompts
Windows 8.1 & 8:
Open Start > Click Control Panel > Select Programs & features > Find iTop Data Recovery and click Uninstall > Click the Yes button when prompted to uninstall the program > Follow the on-screen instructions to remove the product from your computer
Windows 7:
Click Start on your taskbar and select Control Panel > Under Programs, click on Uninstall a program > Select the product you wish to uninstall > Click Uninstall at the top of the program list > Follow the on-screen instructions to remove the program from your computer.
What file types can iTop Data Recovery Recover?
iTop Data Recovery supports recover hundreds of different file types. You can easily recover any of the below-mentioned categories of file types by using this software:
Photos:
*.jpeg,*.png,*.ico,*.bmp,*.jpg,*.gif,*.dib,*.dif,*.eps,*.iff,*.mpt,*.tif,*.tiff,*.cdr,*.wmf,*.pcd,*.tga,*.svg
Videos:
*.avi,*.mov,*.mpg,*.mp4,*.flv,*.wmv,*.mpg,*.mpeg,*.mpe,*.mpv,*.m1v,*.m4v,*.ifv,*.qt*,rmvb,*.mkv,*.asf,*.rm,*.navi,*.3gp,*.swf
Music:
*.mp3,*.wma,*.ogg,*.wav,*.aac,*.m4a,*.flac,*.aif,*.aiff,*.aifc,*.aifr,*.midi,*.mid,*.rmi,*.mp2,*.ape,*.vqf
Documents:
*.doc,*.xls,*.ppt,*.odt,*.ods,*.pdf,*.docx,*.xlsx,*.pptx,*.odc,*.txt,*.html,*.htm,*.ini,*.text,*.log,*.pas,*.h,*.cpp,*.xml,*.lan
Archives:
*.rar、*.zip、*.7-zip、*.ace、*.arj、*.bz2、*.cab、*.gzip、*.iso、*.jar、*.lzh、*.tar、*.uue、*.xz、*.z、*.7z、*.b64、*.bhx、*.bz、*.gz、*.hqx、*.img、*.lha、*.mim、*.taz、*.tbz、*.tbz2、*.tgz、*.tz、*.uu、*.uue、*.xxe、*.zipx、*.arc, *. paq, *.pea, *.quad, *.balz、*.upx、*.wim、*.deb、*.dmg、*.rpm、*.udf
Other types:
*.TBB,*.eml,*.pst etc.
Can you guarantee that iTop Data Recovery can recover all files?
The simple answer to this question is No. Although iTop Data Recovery is a powerful data recovery software, it can not guarantee 100% recovery rate. Sometimes Windows has overwritten the file's original location, and other times the file is too corrupted to recover. You can check this with iTop Data Recovery at almost any time. Once you verify that you can preview them, then you can upgrade to iTop Data Recovery PRO to recover them.
Why the recovered files cannot be opened?
A file is saved as 2 parts on the storage device: directory info (which is comprised by file name, time stamp and size info, etc.) and data content. If the files with original file names and folder structures cannot be opened, one possible reason is the corrupted directory info.
Can I recover data to the original drive?
Any changes to the drive would alter or damage the storage structure of the lost files. If the recovered files are saved back to the original drive, the original data structures and data content will be corrupted or overwritten, resulting in permanent data loss. As a result, you should prepare another disk to save the files on.
What is DualSafe Password Manager?
DualSafe Password Manager is a simple, secure, strong, and smart password manager. In addition to managing your password, you can also save your secure notes, payments info, and personal info to DualSafe Password Manager. You can keep all your secrets here.
Is it secure to save my data in DualSafe Password Manager?
Your data security is our top priority. With the zero-knowledge security architecture, DualSafe Password Manager encrypts your data using AES-256 with a unique key that is randomly generated based on your account and password of DualSafe Password Manager. All of this is done locally on your side, thus no one else, including all members in DualSafe Password Manager team, can access your data.
When syncing your data, DualSafe Password Manager re-encrypts your data via HTTPS and then syncs your data seamlessly between your devices.
So your data security is guaranteed during all processes.
How to add my data to DualSafe Password Manager?
You can add your data to DualSafe Password Manager in 2 ways:
1) Run DualSafe Password Manager, click the Add Item button to add your data one by one.
2) Import your data from a CSV file.
When you run DualSafe Password Manager for the first time, it will guide you to add data manually or import data from a CSV file. In later use, you can go to More Tools, find Import and Export to import data from a CSV file.
How to get a CSV file for my data saved in browsers and other password managers?
Click here to get the detailed steps for how to get a CSV file from browsers and other password managers.
How to add DualSafe Password Manager extension to my browser?
DualSafe Password Manager extension helps you auto save, auto fill, and auto update your login data and payment info safely.
Please follow the steps below:
Launch DualSafe Password Manager> click More Tools> find Add extension to your browser> choose the browser you want and install with one click.
Presently it supports Chrome, Opera, Brave, Edge, and other Chromium-based browsers.
How to activate DualSafe Password Manager Premium after purchasing?
If you already have an account, you can just sign in your DualSafe Password Manager account again to activate the Premium.
If you don’t have an account before placing the order, you will receive an email from noreply@itopvpn.com with your email address as the account and a temporary password (check both of your inbox and spam folder for the email), then please sign in with the account and the temporary password. Please change the temporary password as soon as you signed in.
Why do I need to verify my email?>
It can make sure that you sign up an account for DualSafe Password Manager with a valid email address and you will not miss any important notification from DualSafe Password Manager.
Please make sure to verify your email address as steps below:
Click your account icon at the top left corner and then the Verify This Email button. You will receive an email to verify if the email address is valid.
What is Dark Web Monitor?
Dark Web Monitor helps you check for leaked data (usernames, email addresses, phone numbers, etc. ), and notifies you the leakage in time. This service is provided by Have I Been Pwned, so you can get all leaked results even if the data is not added in DualSafe Password Manager.
What is Password Health?
Password Health ensures your password health by checking the vulnerable passwords such as weak, reused, or compromised ones, and notifying you to update them.
What is One-time Password in DualSafe Password Manager?
Many services support 2-step verification which requires a one-time password or other second step after you entered your password. It adds an extra layer of security to your account in case your password is stolen.
You can save the secret keys of the services with 2-step verification in DualSafe Password Manager. Then DualSafe Password Manager will auto fill the one-time password for you when you log into the services.
How to export the info I stored in DualSafe Password Manager?
Launch DualSafe Password Manager> click More Tools> Find Import and Export> click Export Data>enter your account password>select the file path you want> click Save.
How to uninstall DualSafe Password Manager?
Windows 10:
Open Start > Click Settings > Click Apps on the Settings menu > Select Programs & Features or Apps & features from the left panel > Find DualSafe Password Manager and click Uninstall > Follow the on-screen prompts.
Windows 8.1 & 8:
Open Start > Click Control Panel > Select Programs & features > Find DualSafe Password Manager and click Uninstall > Click the Yes button when prompted to uninstall the program > Follow the on-screen instructions to remove the product from your computer.
Windows 7:
Click Start on your taskbar and select Control Panel > Under Programs > Click on Uninstall a program > Select DualSafe Password Manager > Click Uninstall at the top of the program list > Follow the on-screen instructions to remove the program from your computer.
1. What is iTop PDF?
iTop PDF is a full-featured yet easy-to-use PDF tool, which helps view, edit, comment, convert, and protect your PDF documents. It is not only an ideal choice for you to create perfect PDF documents by editing content, adding text, images & many kinds of annotations, attaching links, manipulating pages, customizing your unique stamp or watermark, etc., but also a powerful converter to perform the conversion seamlessly between PDF and a wide range of file formats like Word, Image, Excel, PPT, Text, etc.
2.What are the differences between iTop PDF Free and VIP?
The picture below highlights the main differences between the two versions. 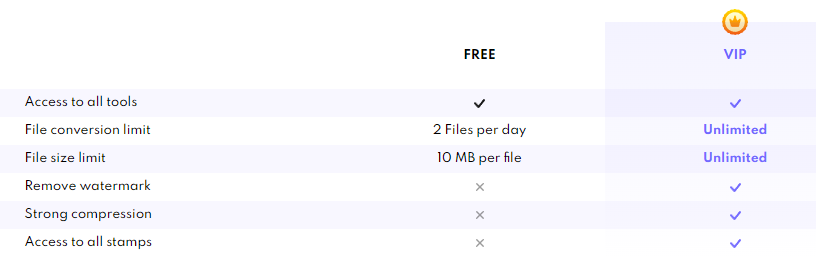
3.I haven\'t received my purchased product / license / activation code yet, what should I do?
1) You don\'t need a license or activation code to activate iTop PDF VIP account.
2) If you already have an account, you can just log in with your iTop PDF account again to activate the VIP.
3) If you don’t have an account before placing the order, you will receive an email from noreply@itopvpn.com with your email address as the account and a temporary password (check both of your inbox and spam folder for the email), then please log in with the account and the temporary password. It’s recommended to change the temporary password immediately after you log in.
Or click here to view the detailed instructions on how to activate VIP account.
4. Does iTop PDF account support multiple devices?
Yes. One iTop PDF account can be logged in on up to 3 devices at the same time.
5. What if I forgot the password of my iTop PDF account?
Please launch iTop PDF > click Log In at the top right corner > click Forgot password? > follow the on-screen prompts to reset your password. Or you can reset your password via https://www.itopvpn.com/reset-password
6. What file formats does iTop PDF support to convert?
iTop PDF enables you to convert PDF to/from Word, Image, Excel, PPT, Text, etc. in high quality. Common file formats are all supported: 'bmp'; 'dib'; 'jp2'; 'jpg'; 'jpeg'; 'jpe'; 'jfif'; 'gif'; 'tif'; 'tiff'; 'png'; 'doc'; 'docx'; 'xlsx'; 'pptx'; 'xml'; 'txt'; 'md'.
7. What factors can cause a converted file to be output with poor quality?
iTop PDF is capable of recognizing and converting all kinds of PDF files. The program can not only work perfectly with text-only PDF files but also work with image-based PDFs. The following factors may cause quality issues:
- It contains many complex elements such as pictures, graphs, etc.
- The original content in the PDF file is blurry.
- The text has the same background color as the PDF file.
To get better converting quality, it is suggested to choose the high-quality file to convert into other formats. Of course we’ll also keep working to improve the converting quality for your better experience.
8.Can I convert more than 1 PDF file at the same time?
Yes, in the iTop PDF Converter window, you can add more than 1 PDF file here and perform batch conversion. But Free version users can only convert 2 files per day. You can upgrade to VIP to get unlimited batch processing. Besides, you can Creat Shortcut on your desktop for quick access in future.
9.How to add attachments in PDF?
iTop PDF allows you to add attachments to PDF files in two methods:
1) After opening your PDF file with our program, click the Attachments panel on the left side, then click the Add Attachment icon to browse the file that you want to attach.
2) Add the attachment as a comment. Click the Comment tab > Attachment > click on the page where you want to add this comment > on the pop-up dialog, select a file to attach.
10.Why do I have the iTop PDF watermarks added in my PDF file? How to remove them?
For Free version users, after you use these three features (Edit Content, Add Text & Add Image) in our program and save the file, it will be added a default “iTop PDF” watermark. If you want to remove the default watermark, you need to upgrade to VIP first.
11.When I open PDF files, it will open with iTop PDF by default. How do I change this?
This is because iTop PDF has already been set as the default program for PDF files on your computer.
If you want to change it, please right-click one PDF file > click Open with > Choose another app > select the app you want to use. And remember to tick the option Always use this app to open .pdf files at the bottom. After the setting is done, when you double-click the PDF files on your computer, they will be opened with this default program.
12. What is PDF/A?
PDF/A is an ISO-standardized version of the Portable Document Format (PDF) specialized for use in archiving and long-term preservation of electronic documents. PDF/A differs from PDF by prohibiting features ill-suited to long-term archiving, such as font linking (as opposed to font embedding) and encryption. The ISO requirements for PDF/A file viewers include color management guidelines, support for embedded fonts, and a user interface for reading embedded annotations.
iTop PDF supports converting files to PDF/A files and there are many PDF/A types for your choice like PDF/A-1A, PDF/A-1B, PDF/A-2A, PDF/A-2B, PDF/A-2U, PDF/A-3A, PDF/A-3B, and PDF/A-3U.
13. How to change the interface language of iTop PDF?
iTop PDF supports more than 30 languages. Just open iTop PDF > click the Menu icon at the top left corner > click Settings > switch to your desired language > click the OK button to make it take effect.
14. If I uninstall iTop PDF, will the files created by this program be removed?
No, the created files are already saved on your computer, thus they won't be removed with the uninstall process. But if you deleted those files manually, they cannot be restored.
15. What should I do when the file cannot be opened?
- Check if your file needs to enter a password to open it. If so, just enter the correct password first.
- Check if your file is damaged. If so, please load the normal file.
- If not the above reasons, please contact us and provide us with your file for further checkk.
